
I love my little home in the burbs. It’ll never be in Architectural Digest. But here are some projects that I’ve done that have turned my home into my creative oasis. They go from easiest to difficult. (FYI: I like color and sparkly things.)
Tip: All home improvement projects take twice as long and cost twice as much as you expect. It never goes exactly as planned, but creative magic often happens in those unexpected accidents.
My Top 10 DIY Projects
1. Great Knobs

New knobs are the quickest and easiest way to freshen up cabinets, doors or furniture. Anthropologie has great knobs even if they are pricey. Google “cabinet jewelry” if you like shiny things, that’s what my red kitchen knobs and pulls are called.
Tip: Think use before you buy knobs. Don’t use a delicate knob or one with nooks and crannies in a heavy use area.
2. Family Stories

I come from a long line of repurposers. Maw Maw got tired of Paw Paw’s old metal WWI doughboy helmet lying around, so she painted it, drilled a hold in the bottom and made a flowerpot out of it. I love this heirloom and hung it on the wall along with this great photo of my Grandfather’s WWI Army Company. It’s a good conversation piece.
The pictures on the bottom are brass rubbings I did. If you’re in Great Brittan brass rubbings are often listed under things to do with children. These make great souvenirs for any age and can usually be done for a small fee or for free.
Tip: Be careful if you repurpose something vintage, your “improvement” could cause it to lose its value. Find out its value first.
3. The Red Light District
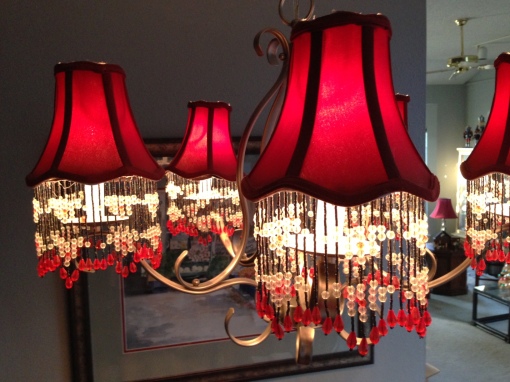
I found this chandelier at a garage sale. I knew I wanted to “funky it up”. I didn’t want to permanently change it knowing I’d eventually get tired of this look. I added light shades and bought some beads on a string. I wanted it to be a little over the top and kitschy. I didn’t really realize that it would look like a light in a bordello. It’s still up and I smile every time I look at my “sexy” chandelier.
Tip: When working on something that will go above your head, think about what it will look like from underneath.
4. Sparkly Things

Tip: When doing something outdoors, make sure your materials are weather proof.
5. Photo Collections

I took B&W photos on a vacation to Malaysia/Singapore. Framing is expensive so I started collecting frames at garage sales. I painted them all black. I got a frame store to cut the mats and the glass and I assembled them. I did this for about $200 and as opposed to spending that much per picture.
Tip: When putting together a collection to hang, arrange them on the floor first before hanging.
6. Accent Walls
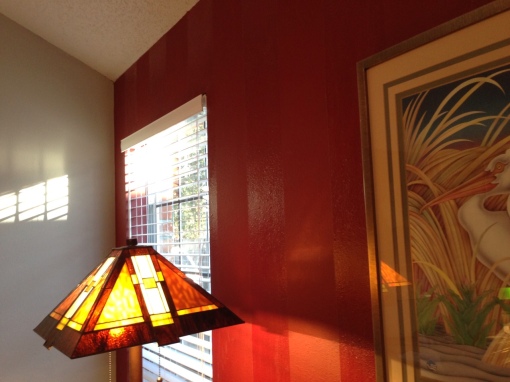
 I have an aubergine wall and I wanted a red wall. I wanted it to be a little different so I striped it. The secret is taping. You’ll need a ruler and a level—I lightly drew a pencil line before I taped it. This is a real pain to do and takes more time than painting, but is critical to its success. I painted it with a matte paint and used polyurethane to create the stripe.
Tip: Use a matte and high gloss paint of the same color. The polyurethane left foamy residue. Dark colors work better than light colors.
7. Can you move that over an inch?

I saw an ad in some magazine for a vinyl clock that goes on the wall like wallpaper. I created my own and painted it on the wall. I found a few clock shapes I liked with a photo search online and then drew it in the computer program Illustrator. I printed out the actual size on a large poster printer and used it as my pattern. I taped the pattern to the wall and made sure it was exactly where I wanted it before painting. The clock face is real.
Tip: Make your pattern the actual color you want, it’ll confirm whether it’s the color you really want to paint on the wall.
8. Laundry Holder

This may look like a chair, but it’s where I throw my clothes. It was my grandparents’ parlor furniture, from the 1930’s. The cushion is stuffed with horsehair and is very uncomfortable. It was shabby and not in a cool shabby chic way when I got it. So I painted and re upholstered the sofa and two chairs. Painting the details showcased the craftsmanship in a way that wasn’t noticed prior to the paint job. Paint is an easy way to make an old piece of furniture contemporary.
Tip: When painting furniture, have a plan. Take a picture; try out color schemes with markers or colored pencils before painting.
9. Hurricane Bar

I have this because my sweetie is a man of practical skills and loves to build furniture. I wrote a post call “If you give Connie a glass of wine” about creating this. The idea came post hurricane when fence’s were blown down and I needed a something to hold my wine and wine glasses.
Tip: You have to have the right tools to do this.
10. The Big Kahuna: Bathroom Remodel

Just like #9, this happened because my sweetie knows how to do these things—electrical, plumbing, furniture building. We had a plan, a small budget (that doubled), the time and another bathroom we could use. It was designed around the vessel sink I found on Overstock.com for $100. I hung art that my daughter did years ago, I pulled a vanity chair that was my grandmother’s out of the attic, a ceiling fan and art that had hung in my sweetie’s previous home that held memories for him. Each of these details was a DIY project in itself. This project confirmed what I already knew about taking twice as long and costing twice as much. But when it’s all done it’s worth it.
Tip: If you put in a vessel sink you need to realize that it’s higher than the sink you’re used to. Build accordingly or your short friends will have to use a step stool to wash their hands.
My little home, it’s full of hidden jewels and jewel tones. And remember, you too can have great knobs.

RE upholstering furniture: several years back, I decided to reupholster my 7 ft couch. It had a solid seat and four back cushions. I was working parttime in a fabric store, so I had gotten the bolt of fabric at a discount & I though the rest should be simple! It took me 2 1/2 days to pull out all the staples. I used the original fabric covering as a pattern (it wasn’t in that good a shape!). Then I had to ‘build’ saw horses to keep me from having to stand on my head to work on it. It took a looonnnng time (too embarrased to mention how long) and if a friend had’t helped and encouraged me it probably never would have gotten done. The moral: when you get an estimate from an upholsterer as to how much it will cost – PAY HIM!
You are a brave woman for the attempt!
Wow! I’d love to have you come decorate my house! I love unique pieces that don’t necessarily “match” the room, but somehow belong. Glad I found your blog! 🙂
Vikki, I’m glad you found it too!
You are so talented! Thanks for sharing. I especially love the grandfather clock – so clever.
Sharon sorry it took me so long to post your comment, it was stuck in another folder. And thanks!
I want to be just eactly like you! I love what you did. Wish I was only minutes away girly! xxoo
I miss you too! Hugs!